Building the Business Logic in a Custom Lifecycle
A Custom Lifecycle allows the Template Edition workflow to be controlled by user responses at various stages of the Template Edition process.
For example, during the Template Edition, the workflow needs to be different based on the reviewer's and approver's responses. If they approve the Template, it should be published. If either of them rejects it, it should go back to the Edition stage.
This can be achieved using the following Custom Lifecycle.
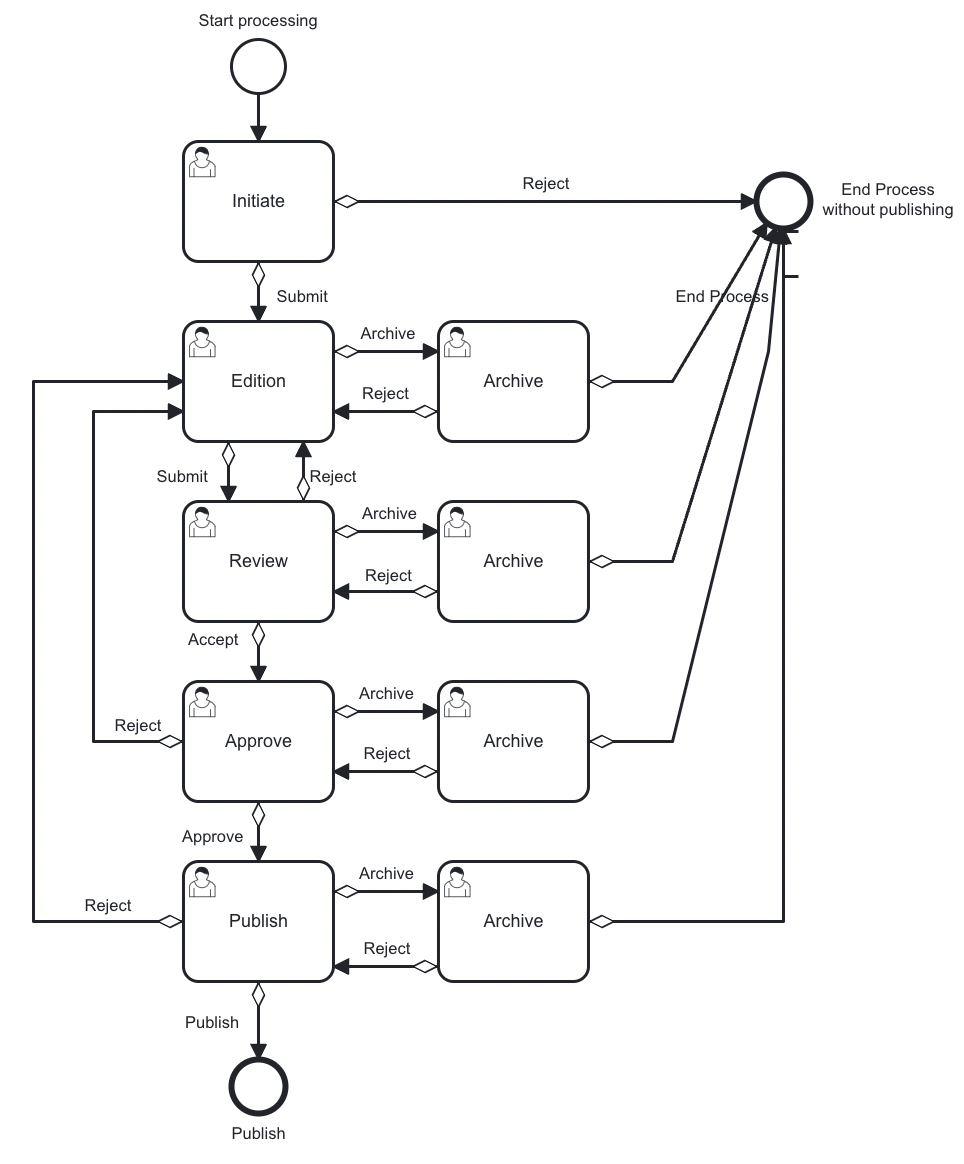 |
The Lifecycle
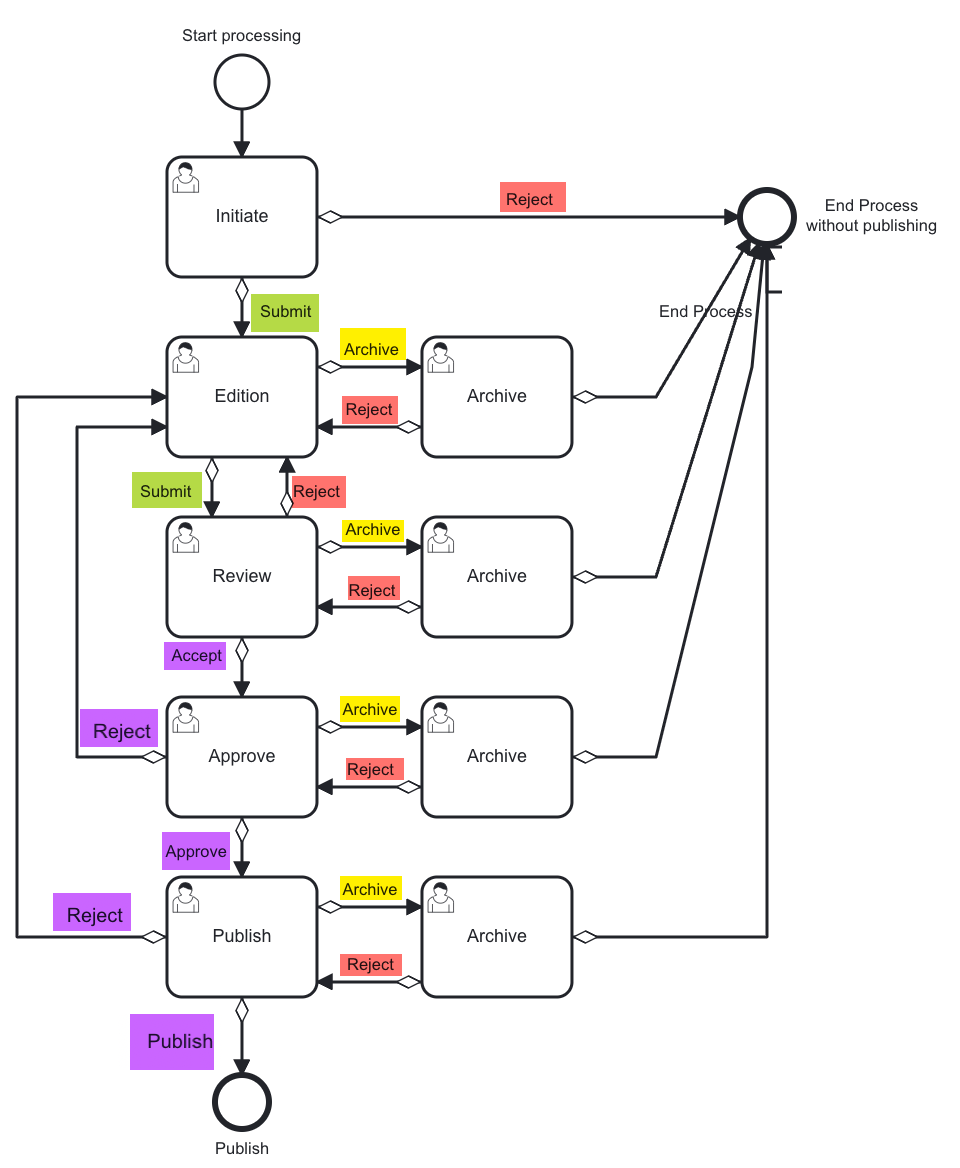
The Lifecycle goes through Initiate, Edition, Review, Approve and Publish stages.
The user authorised to perform the Approve Task can enter Approve or Reject in the associated user form. Based on the response, the Task enters the Publish stage or is returned back to Edition stage.
The user authorised to perform the Publish Task enters Publish or Reject in the associated user form. Based on the response, the Task is Published or is returned back to Edition stage.
If it is rejected in the Initiate stage, the process ends. The Template is not published.
At Edition, Review, Approve and Publish stages, the Template can be archived and the process ends. The Template is not published.
During the Template Edition Process
When a Template is submitted for Edition based on this Lifecycle, the following occur:
The Template Edition process is initiated (Initiate Task).
The Template moves to the Edition stage (Edition Task). The authorized Template Author makes the required changes to the Template
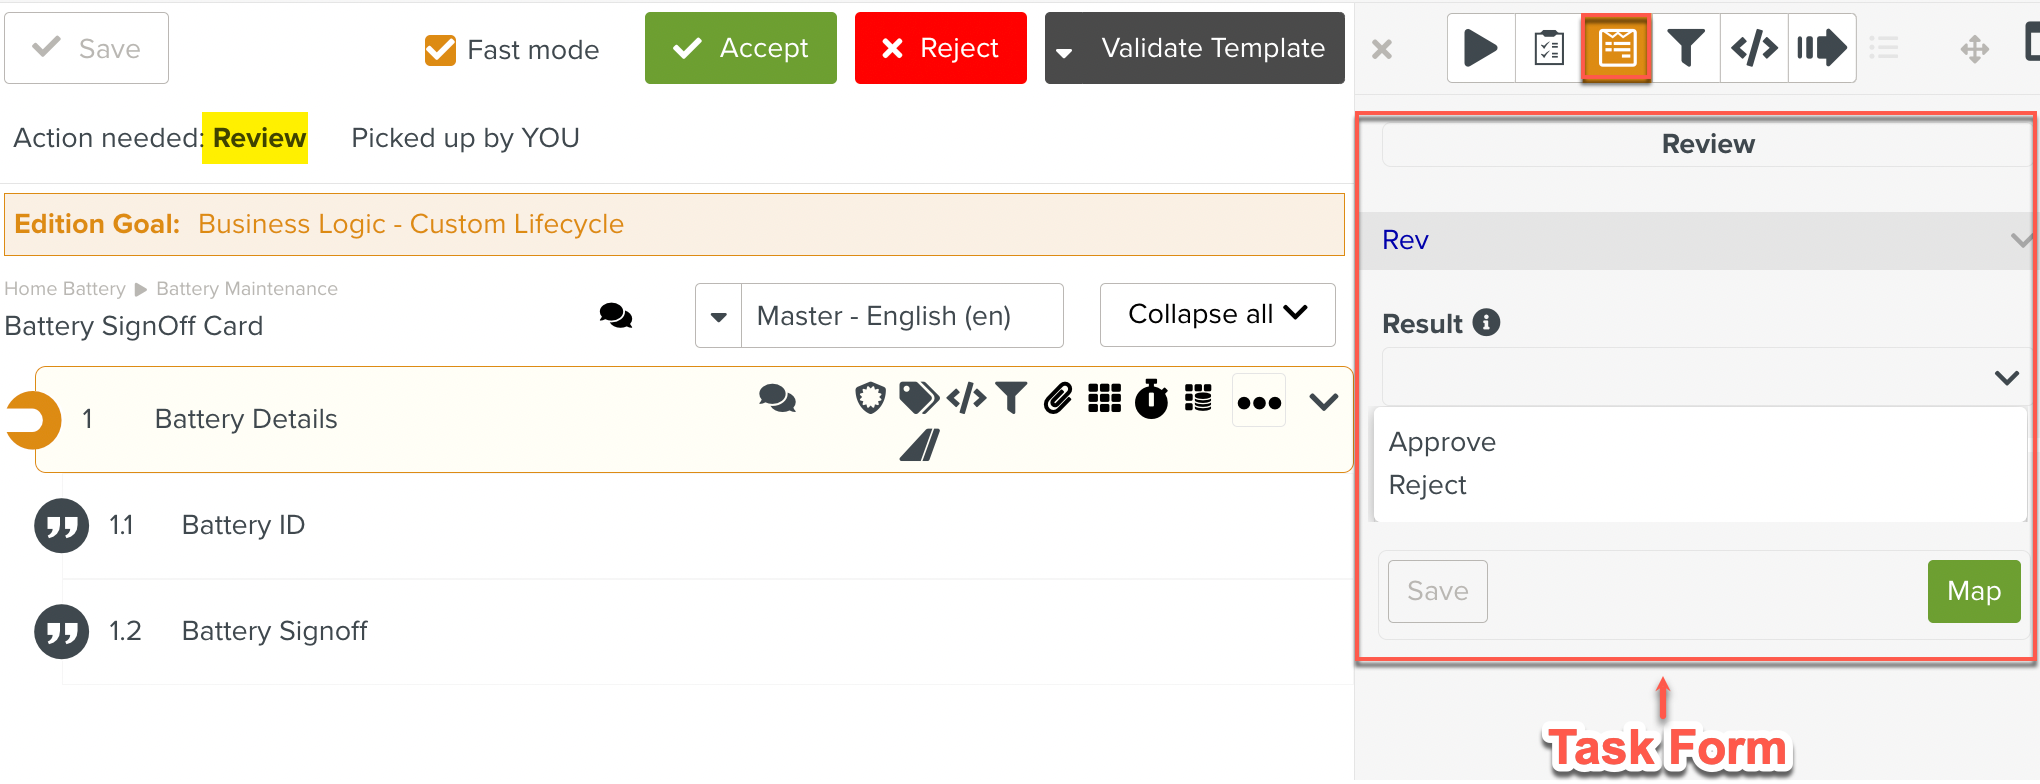
The Template is submitted for Review. (Review Task). There is a form associated with this Task. The Form accepts one of the Review Responses – ( Accept / Reject).
If the Reviewer enters Accept, the Template moves to the Approve Stage.
If the Reviewer enters Reject, the Template moves to the Edition Stage. The Template is not published and the process ends here.
The Template is submitted for Approval. (Approval Task). There is a form associated with this task. The form accepts one of the Review Responses – ( Accept / Reject)
If the Approver enters Accept, the Template moves to the Publish Stage.
If the Approver enters Reject, the Template moves back to the Edition stage.
The Template moves to the Publish stage. There is a form associated with this task. The form accepts one of the Review Responses – ( Accept / Reject).
a. If the Publisher enters Accept, the Template is successfully published.
b. If the Publisher enters Reject, the Template moves back to the Edition stage
During any of the above stages, the user may choose to archive the Template.
You can create a Custom Lifecycle by adding the required elements as described here. In order to add the business logic, we need to add conditions and Task Forms.
For the example discussed above, we will add the required behavior into the elements of the Custom Lifecycle.
To add the behavior into the elements:
The conditional flows in the Custom Lifecycle are of four different types. The code that corresponds to the type of Condition Expression is listed below.
Color (below) | Workflow | Condition Expression |
|---|---|---|
| Move to the next stage |
|
| Move to the previous stage |
|
| Archive the Template |
|
| Move based on user input |
or
|


 |
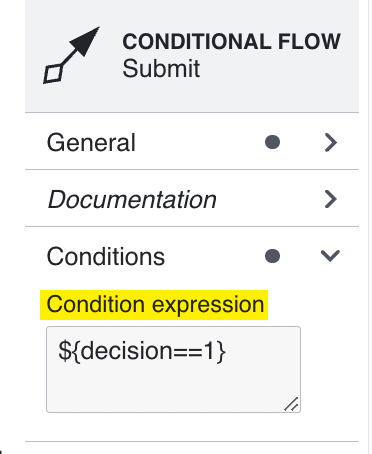
For each conditional flow, add the required condition expression to the Condition Expression section as shown below.
 |
The Approve User Task accepts user input. A Task Form is added to the User Task to acquire the user input.
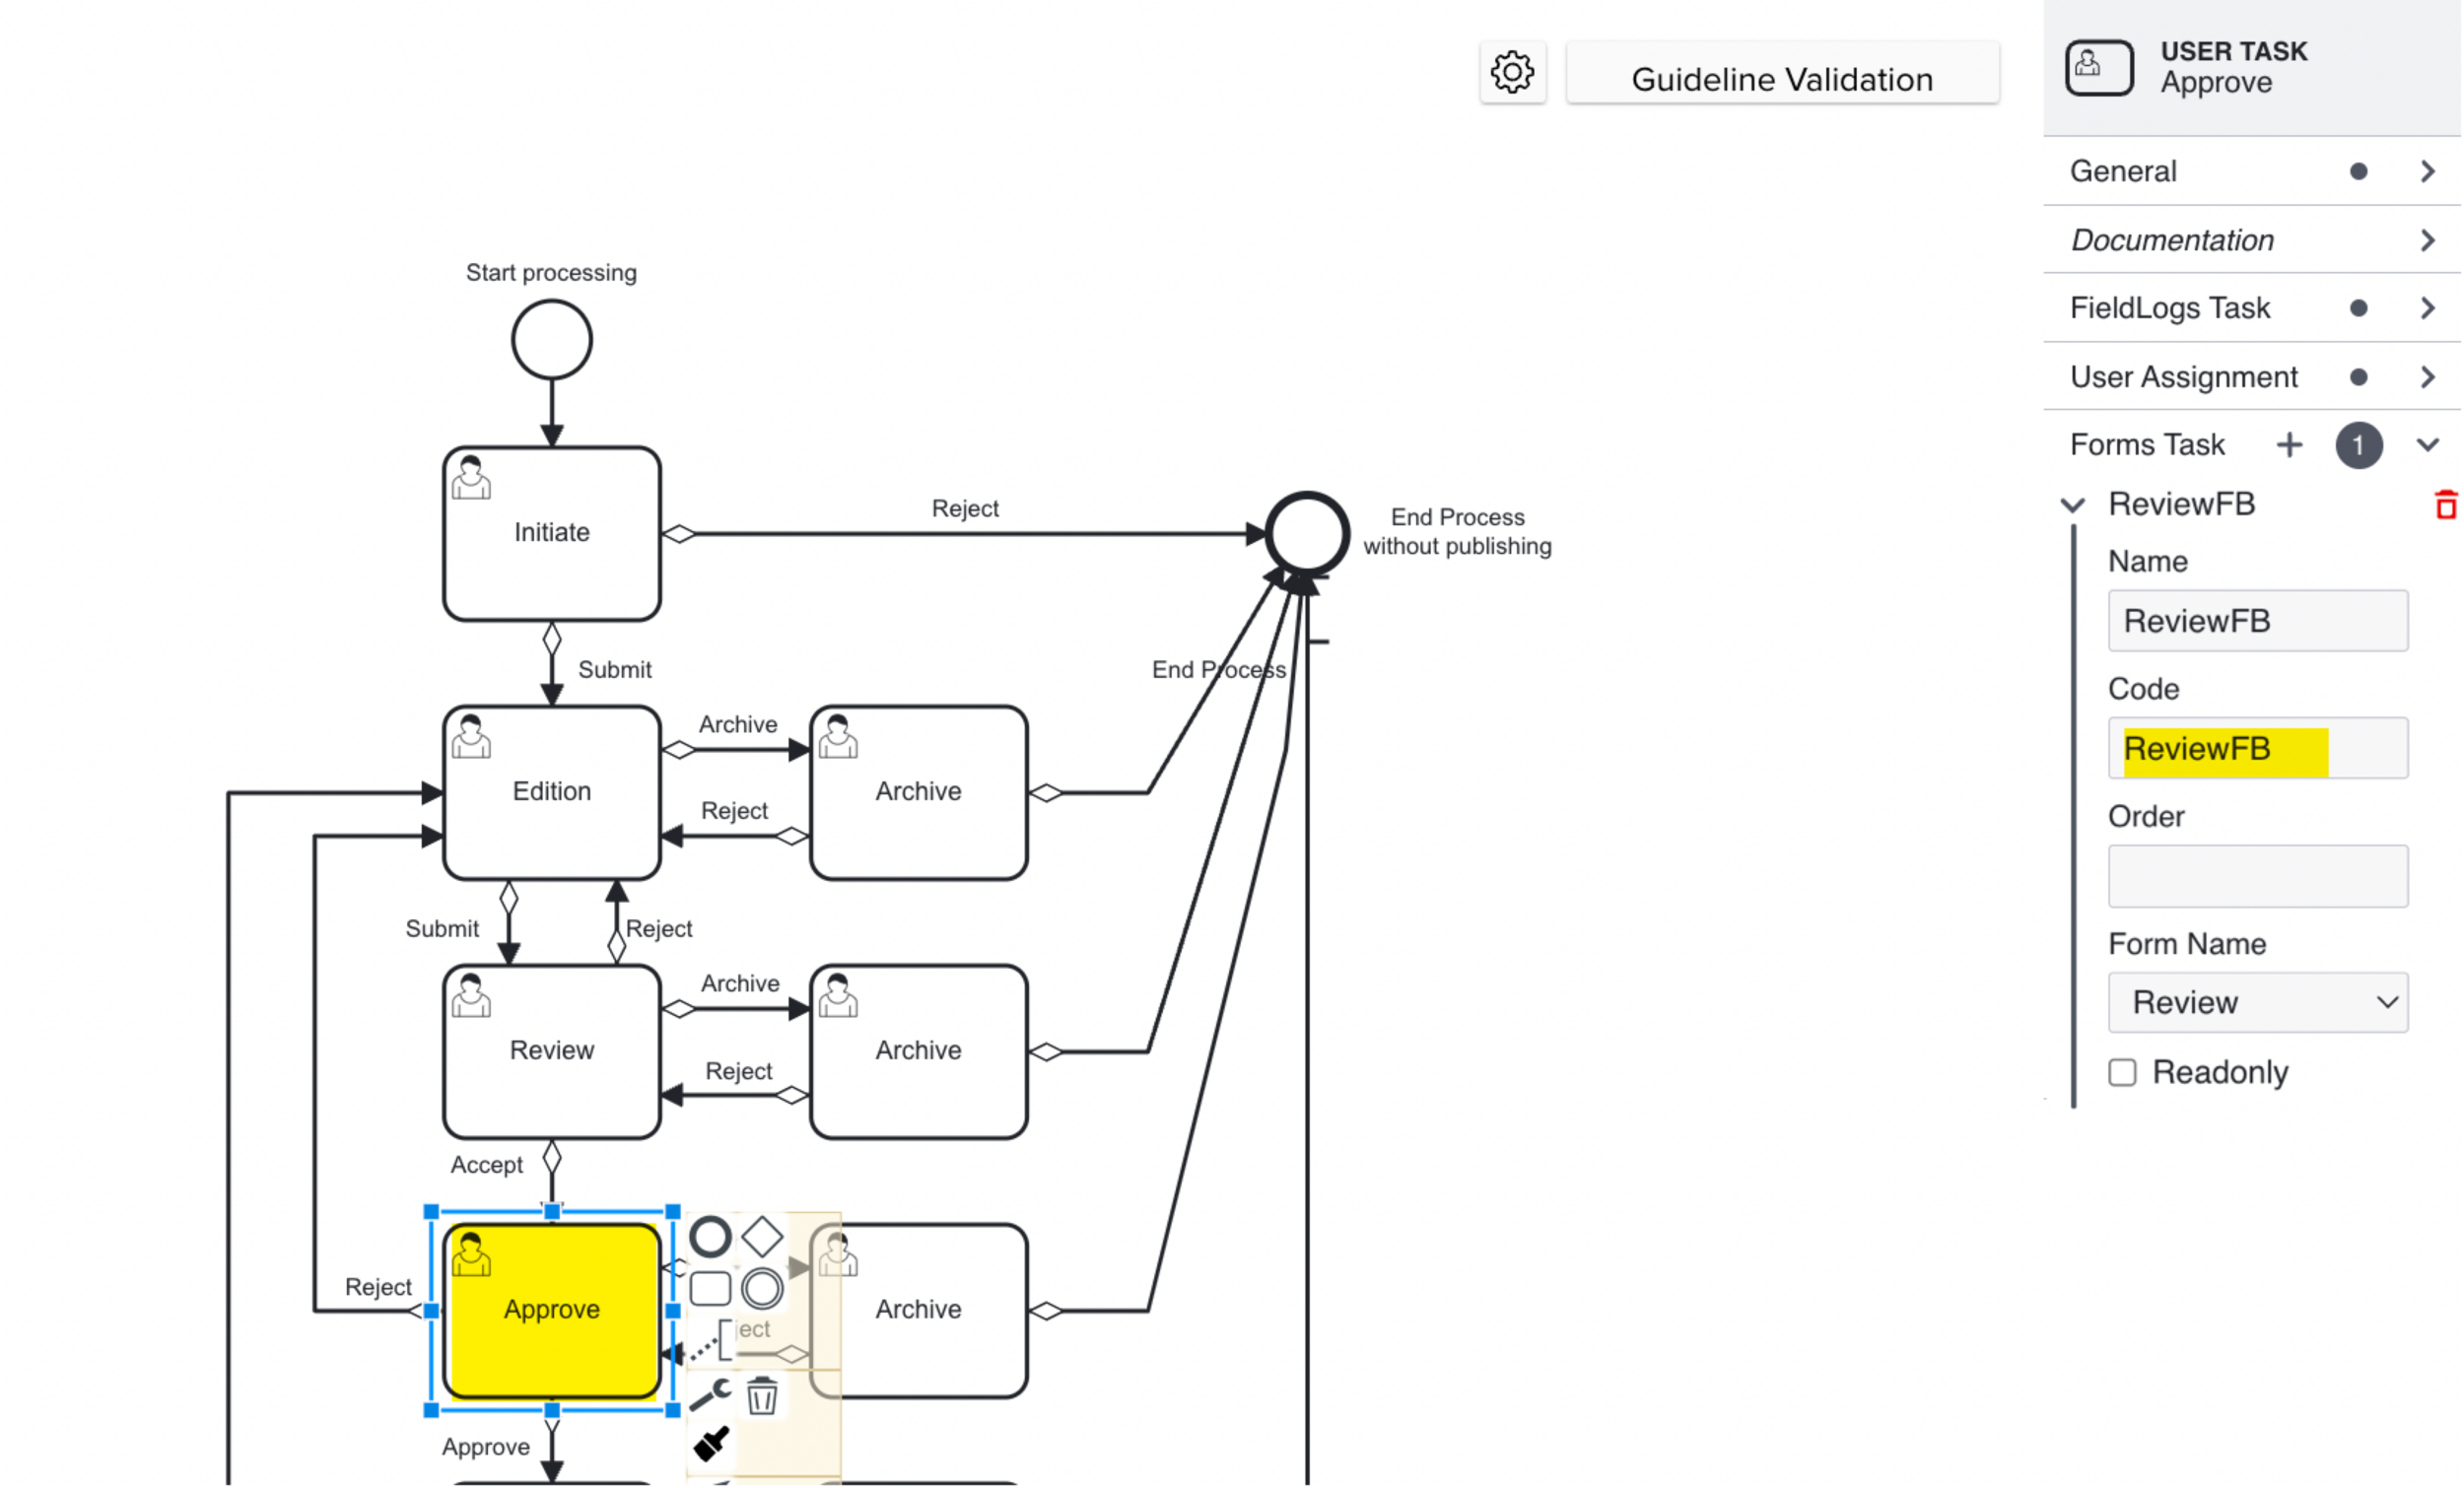
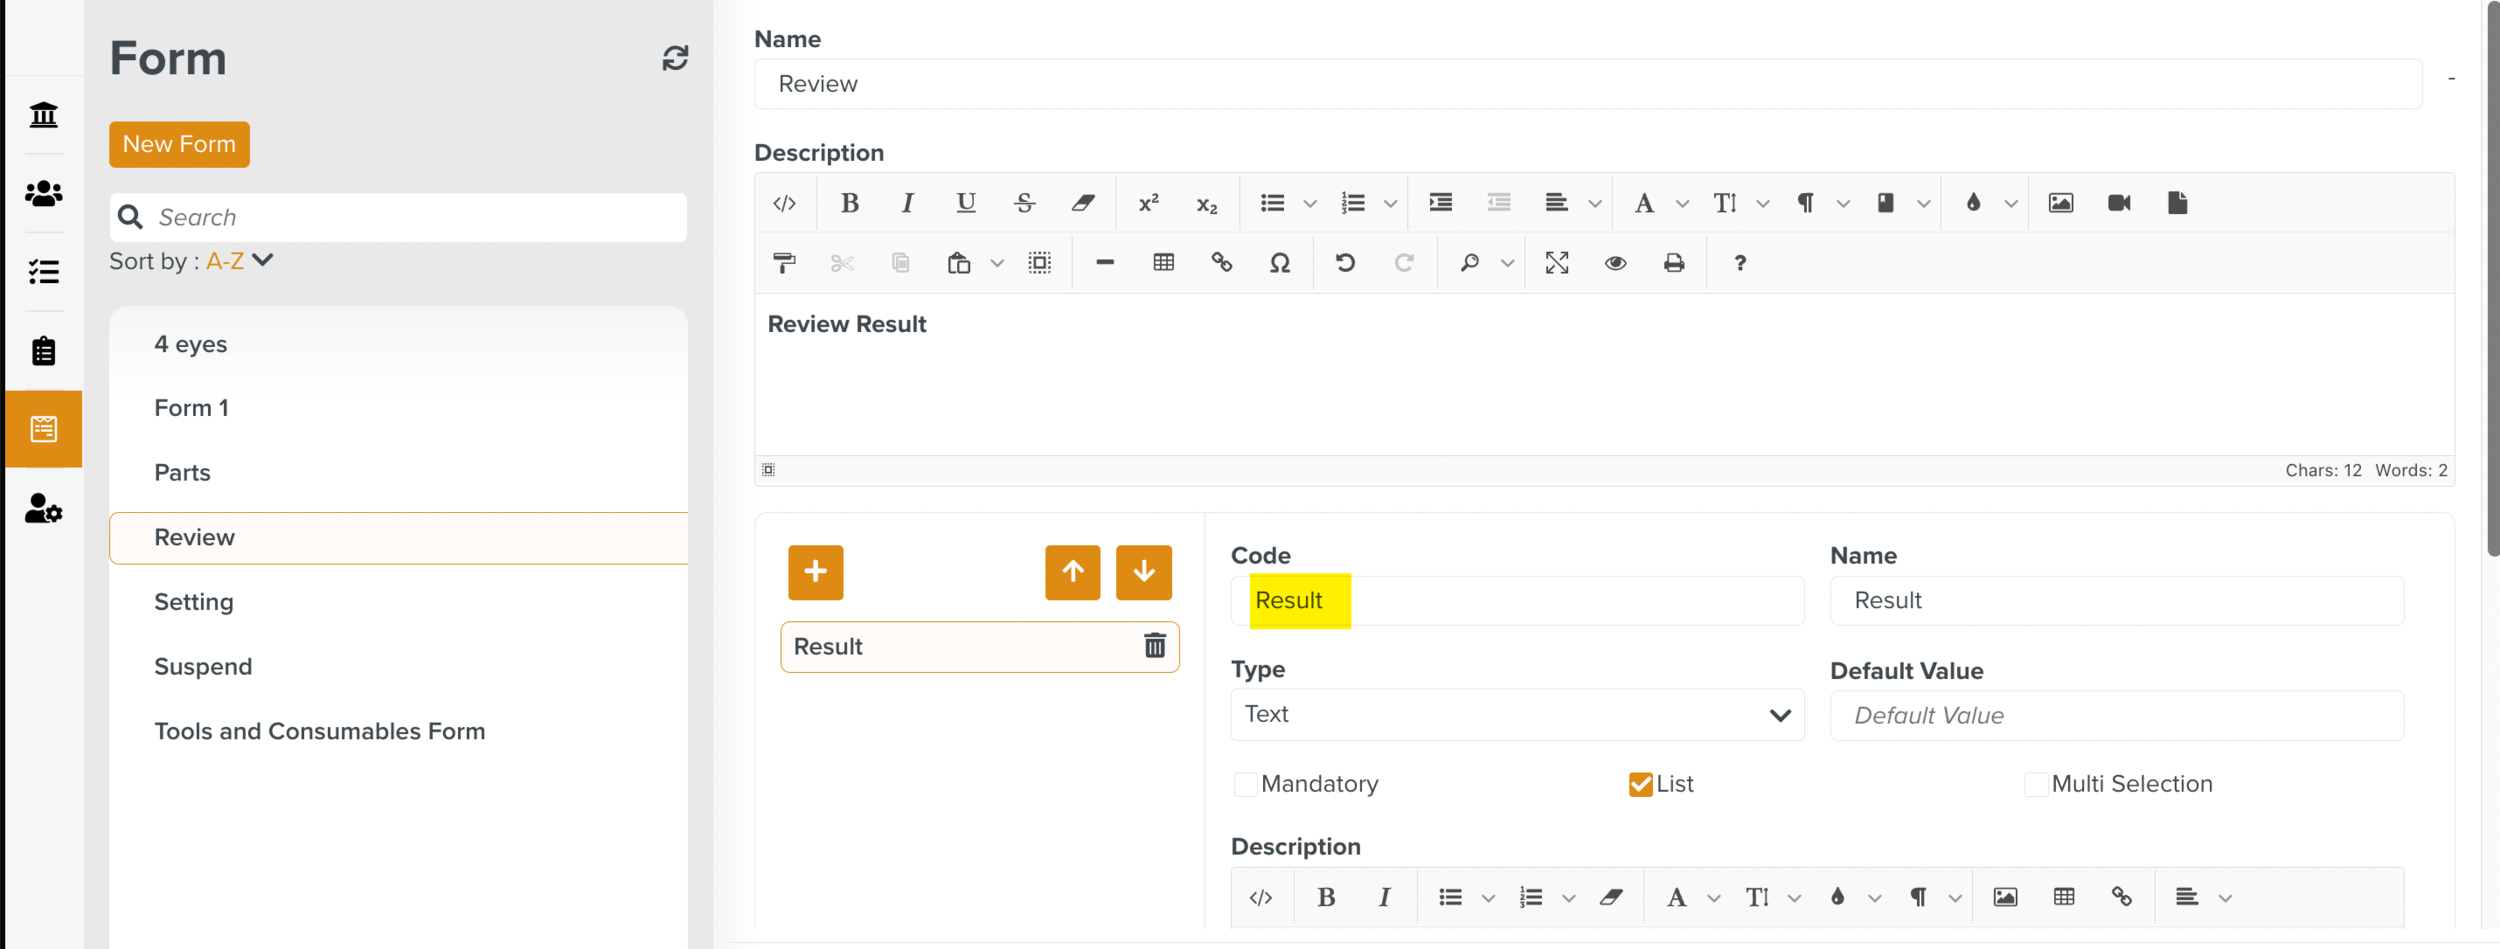
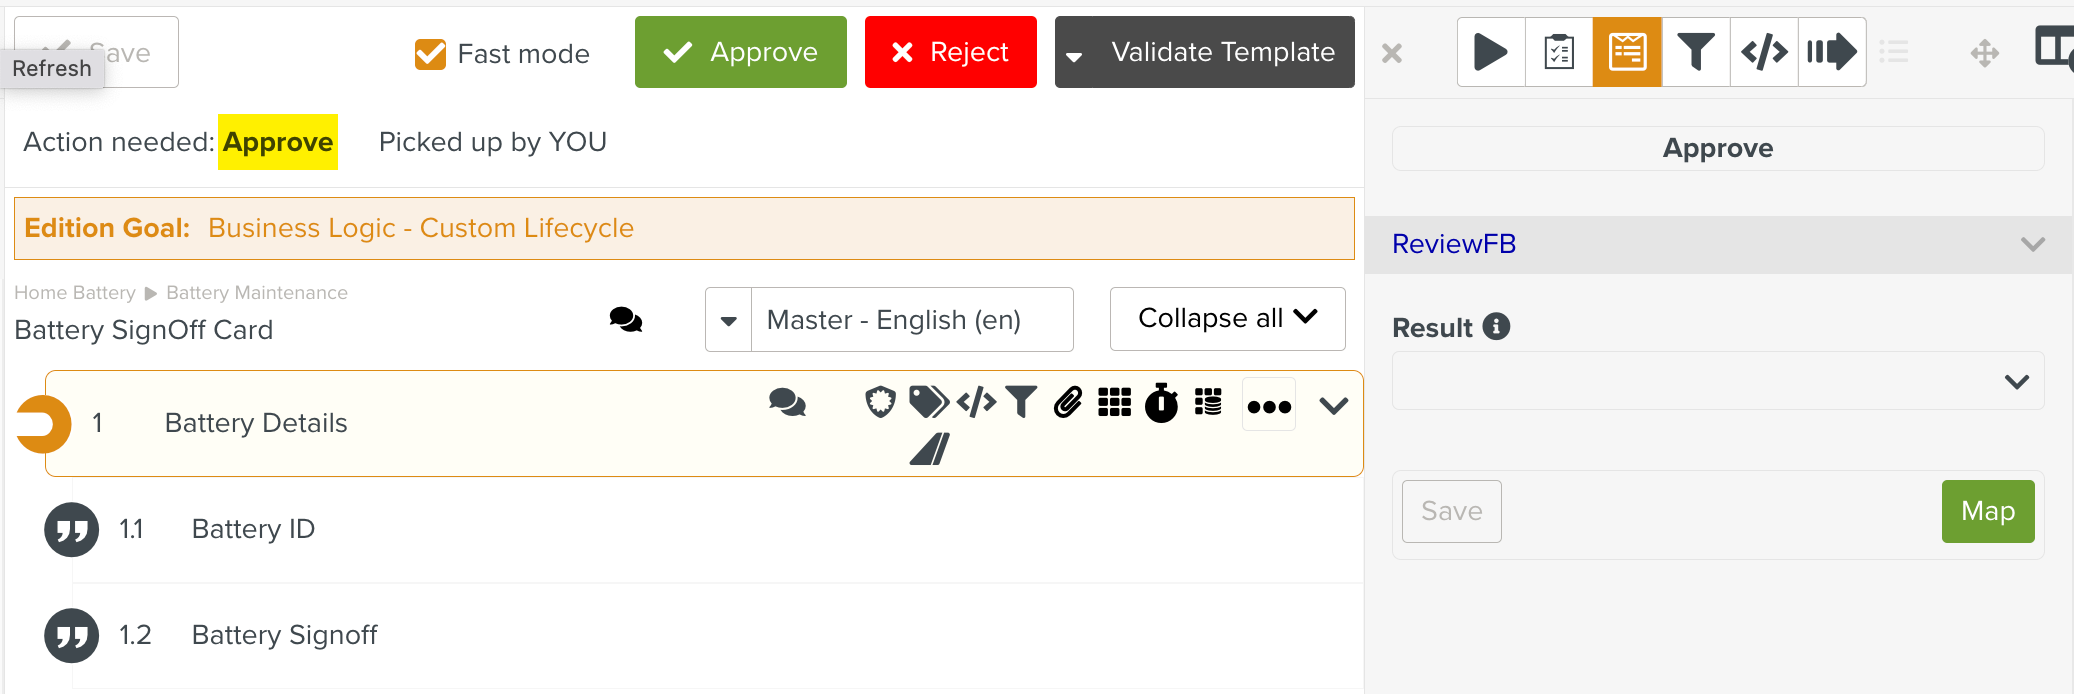
The Task Form with code ReviewFB used in the above screenshot is shown below.
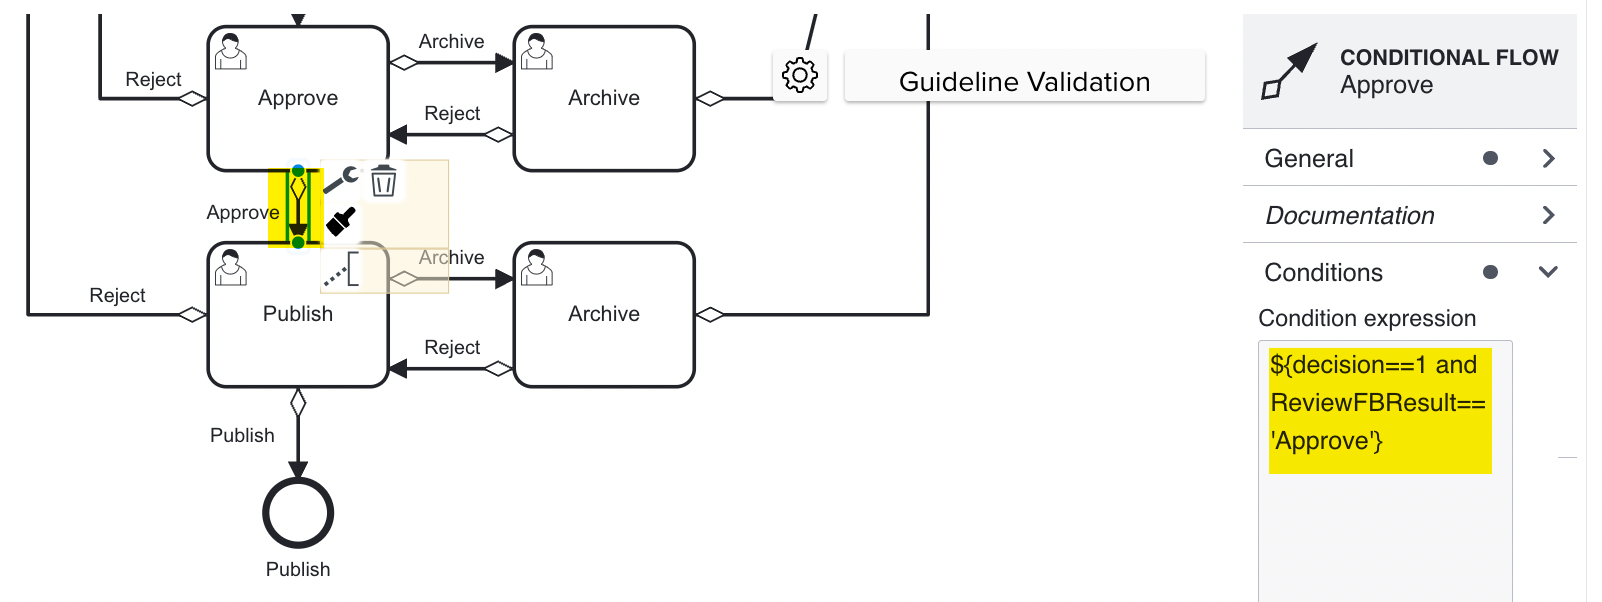
The following condition is added to the Approve conditional flow so that the workflow will move to the next stage only when the user input is Approve. The condition is specified in the format <FormCode on the Lifecycle><PropertyCode on Form>=='Response'.
Here, the FormCode is ReviewFB, PropertyCode is Result, and the Response is Approve.
The following condition is added to the Reject conditional flow, so the workflow will move to the Edition stage when the user input is Reject. The condition is specified in the format <FormCode on the Lifecycle><PropertyCode on Form>=='Response'.
Here, the FormCode is ReviewFB, FieldCode is Result, and the Response is Reject.

Similarly, a Task Form Rev is associated with the Review user task. A condition is added to the Accept conditional flow to move to the next stage only when the user input is Approve.
A similar Task Form is associated with the Publish user task. A condition is added to the Publish conditional flow to Publish the Template when the user input is Approve. Another condition is added to the Reject conditional flow to move to the Edit stage when the user input is Reject.
The business logic is now embedded in the Custom Lifecycle.
Note
You can also enforce 4 eyes review constraint at any stage of the Custom Lifecycle.
Let us walk through a Template Edition Process using the above lifecycle.
The Template is picked up from the Templates Under Edition.
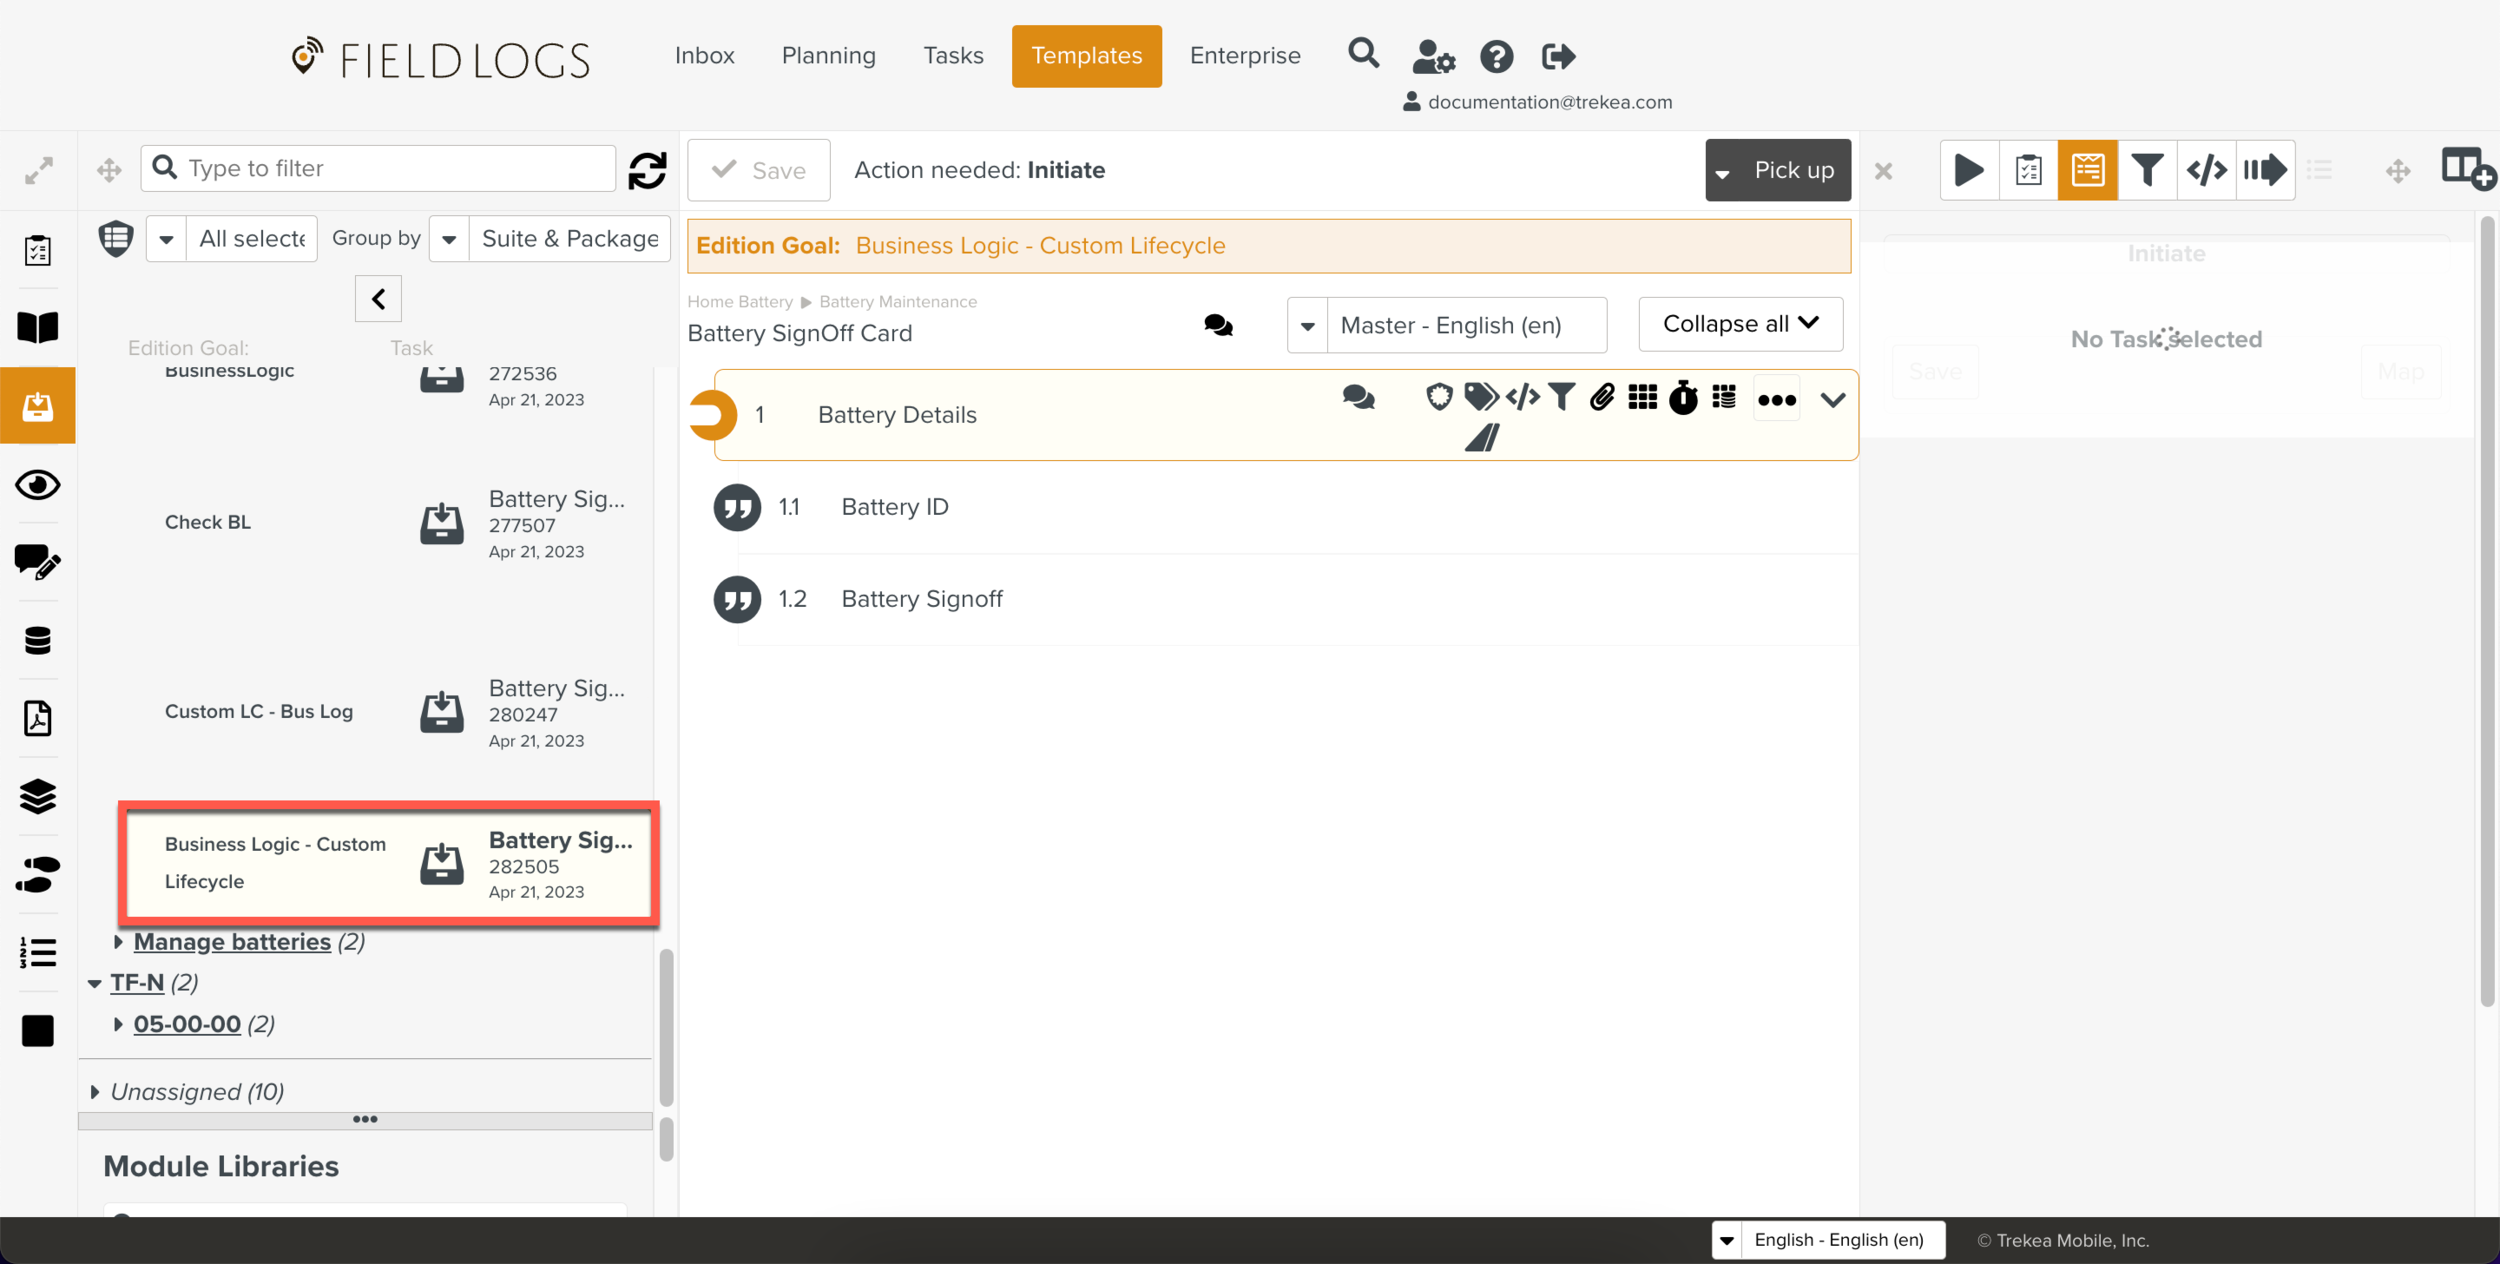
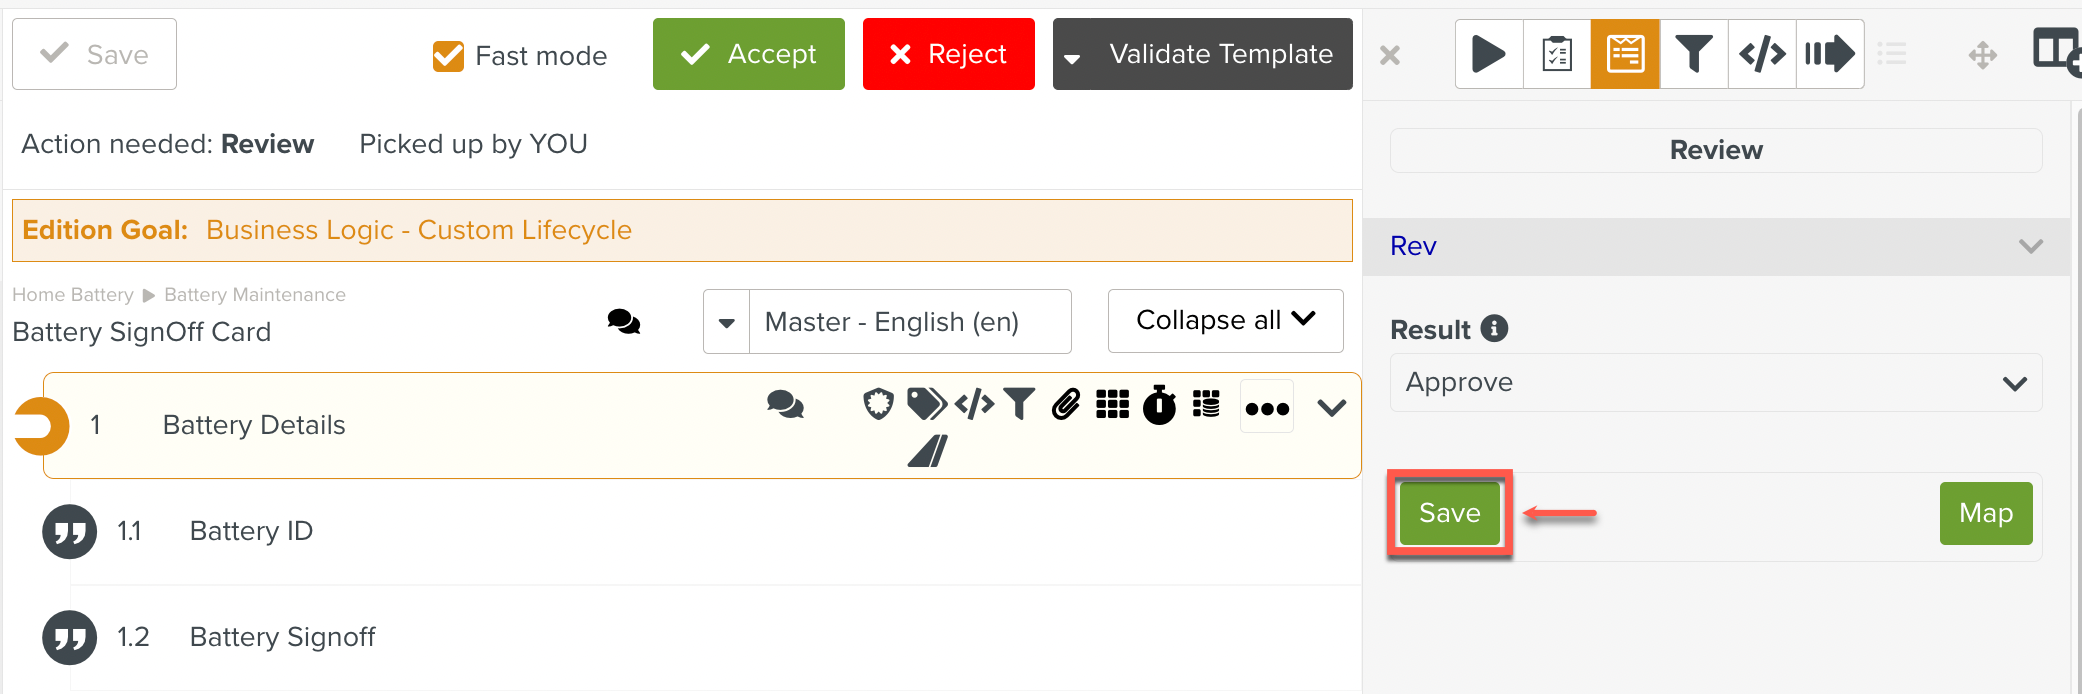
The Template progresses through the Initiate and Edition stages. Then the Template enters the Review Stage. The Task Form Rev appears prompting the user to enter the result of the review.
Let us suppose that the user selects Approve and clicks Save.
The Template then moves to the next stage, Approve.
Let us suppose that the user selects Reject, and clicks Reject as shown.
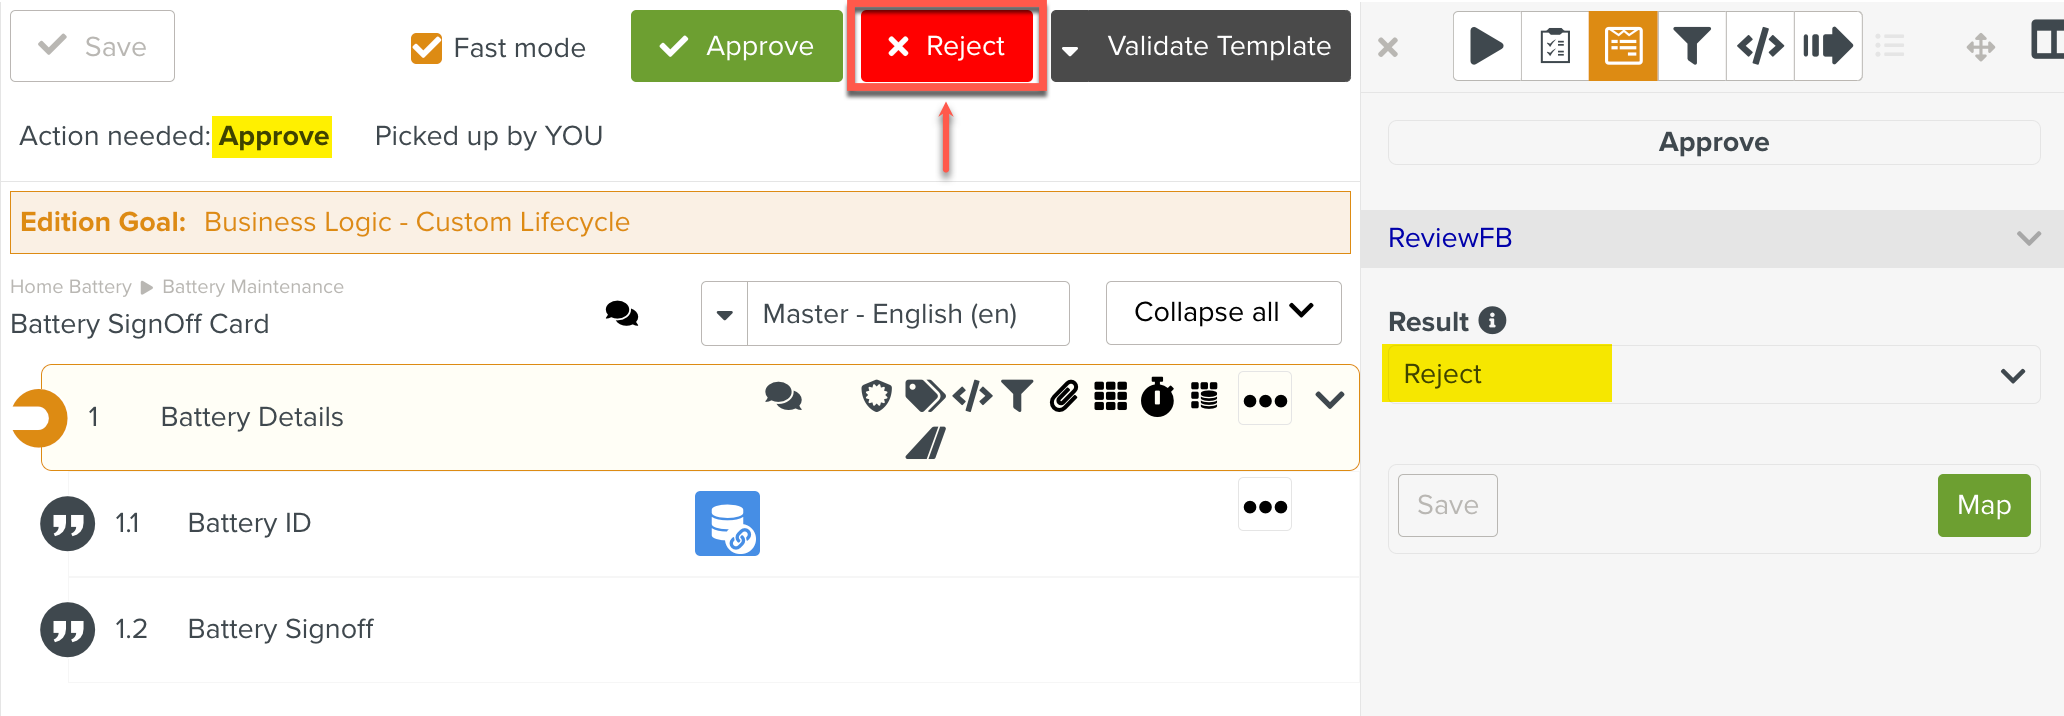
The user is asked to confirm the Reject action.
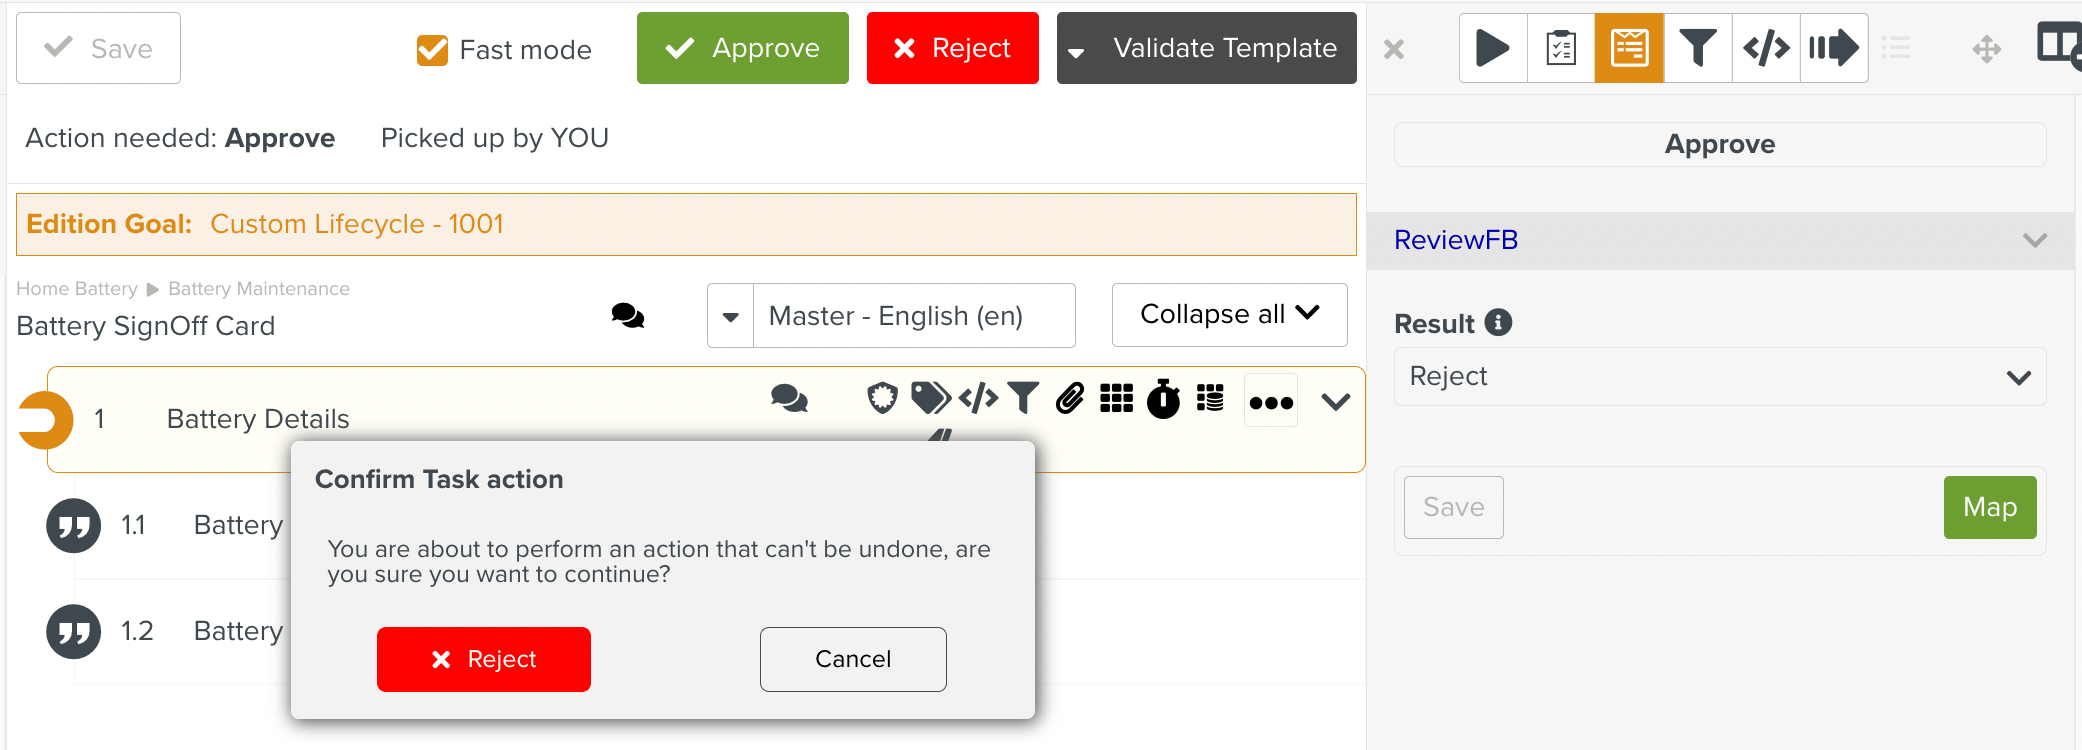
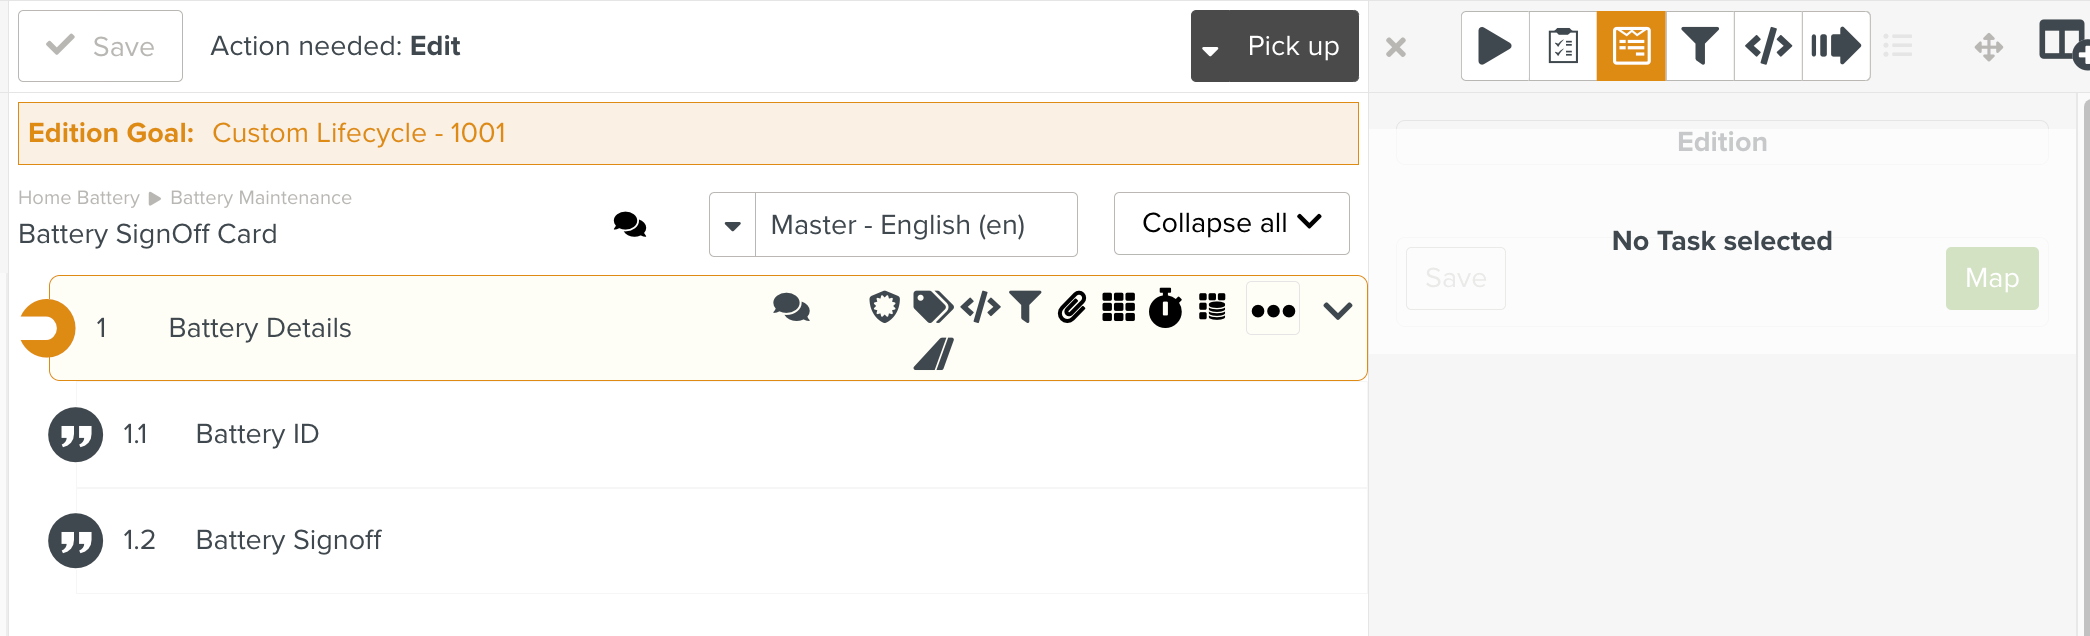
Following user confirmation, the workflow goes back to the Edit stage as shown below.
If the user selects Approve instead, the workflow proceeds to the Publish stage.
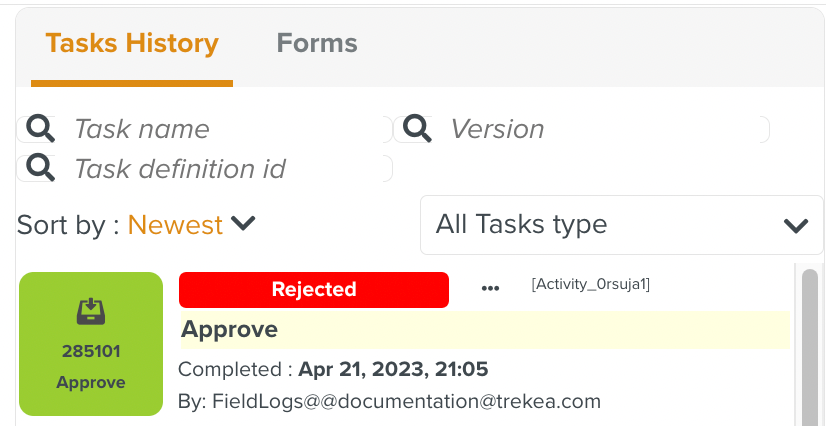
The Process Dashboard and the Process Map provide information about the Template Edition Process.
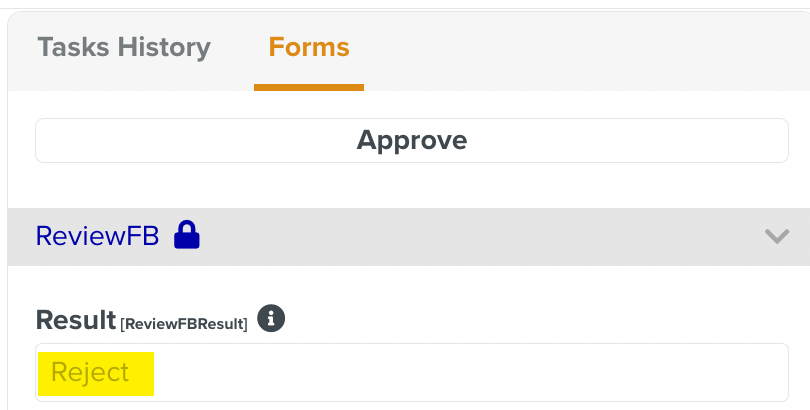
To view the information pertaining to user input, click the tab as shown below.
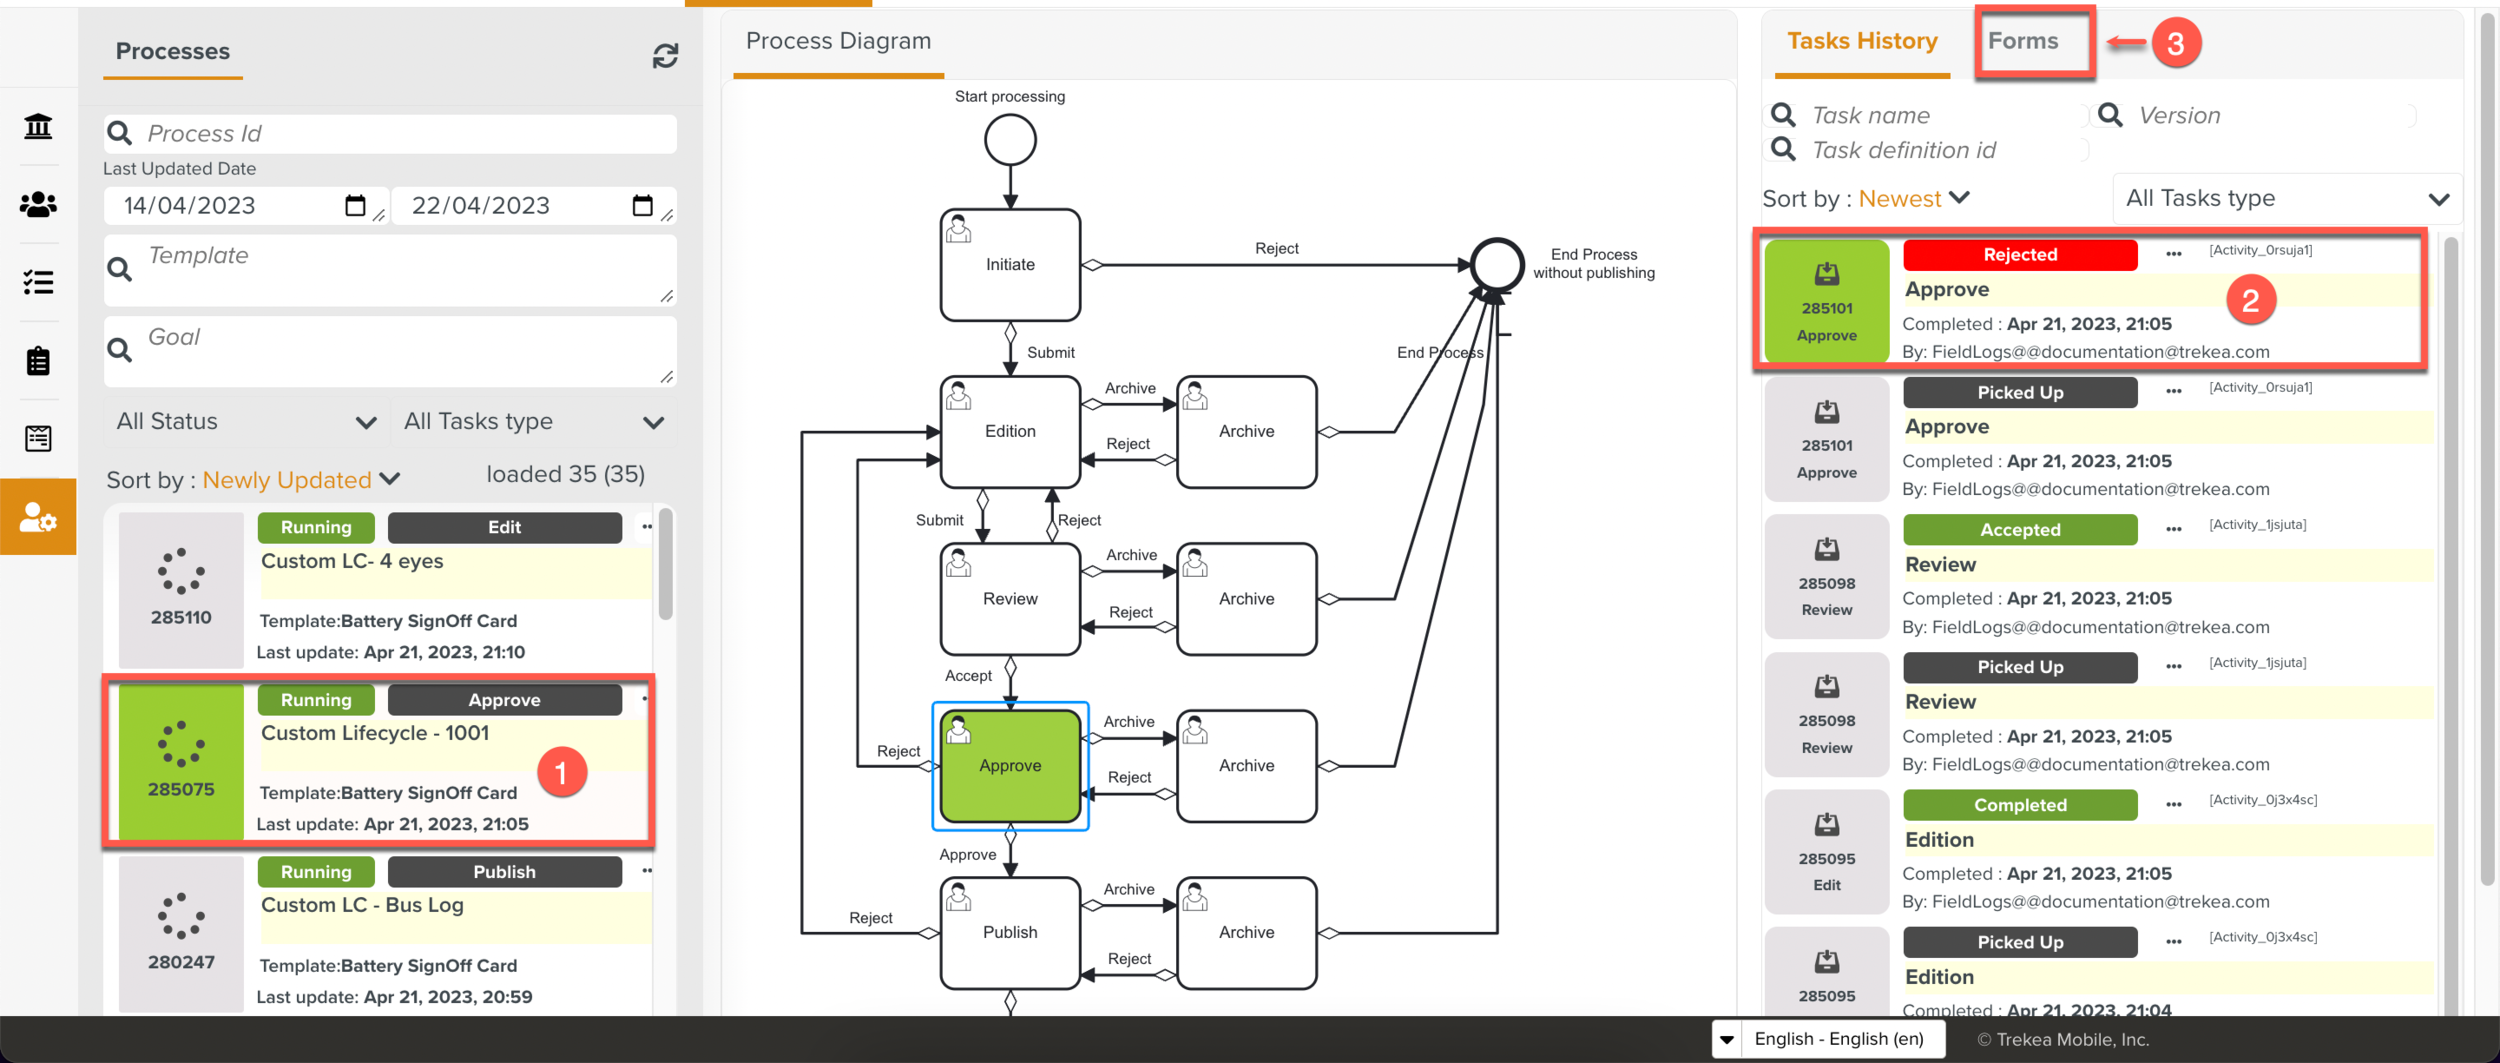
We can see that the user has input Reject in the Task Form ReviewFB.